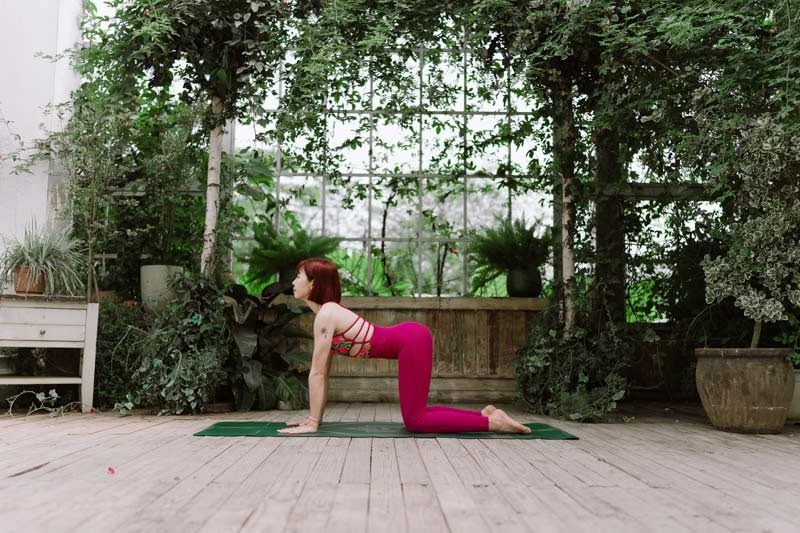
Dancer Pose (Natarajasana) is often seen as the pinnacle of a yoga practice—a beautiful, dynamic sculpture of the human body. When executed correctly, it expands the chest, deeply stretches the hip flexors (a perfect antidote to our seated lifestyles), and builds supreme balance.
However, step into any yoga studio, and you will often see this elegant pose devolve into a violent “tug-of-war” between hand and foot. Driven by the ego and the mindset of “higher is better,” practitioners willingly crunch their lower backs, splay their knees, and lock their standing joints. Instead of freeing energy, they compress their skeletal structures, creating painful blockages.
Let’s decode the biomechanics of a pain-free Dancer Pose and learn how to take flight while keeping your spine and joints strictly out of danger.
1. Anatomy of an Injury: The 3 “Red Zones”
Even though Natarajasana engages the entire posterior chain, three specific “Red Zones” face the highest risk of injury when alignment is compromised:
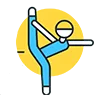
The Lumbar Spine & Psoas:
This is the ultimate conflict in the pose. To lift the back leg high, you need deep hip extension. But if your psoas and quadriceps are tight, they block the femur from moving backward. The Result: When the hip is “stuck,” the pulling force from your arm transfers directly into the lower back. The L4-L5 vertebrae get compressed like a nutcracker, pinching discs and causing sharp, localized pain.
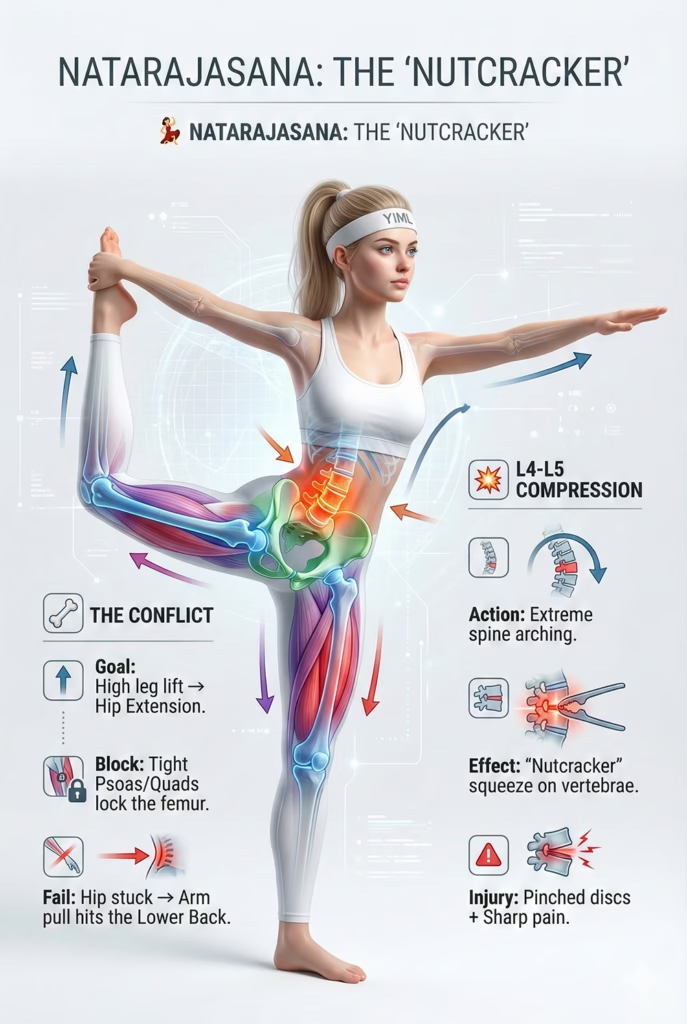
The Sacroiliac (SI) Joint:
The most common cheat code for leg height is opening the hip sideways. The Result: As the practitioner externally rotates the pelvis while trying to keep the standing leg and spine pointing forward, it creates a dangerous shear force on the SI joint. This overstretches the ligaments connecting the sacrum and ilium, leading to unilateral lower back pain.
The Shoulder Joint:
In the full overhead grip (King Dancer), tight pectorals and latissimus dorsi muscles restrict upward movement. The Result: Forcing the elbow to rotate toward the ceiling without sufficient shoulder mobility impinges the rotator cuff tendons, leading to chronic joint pain and inflammation.
2. 4 Classic Alignment Errors (And How to Fix Them)
Here are the four most common mistakes that turn Dancer into a joint-destroyer, along with the professional cues to fix them.
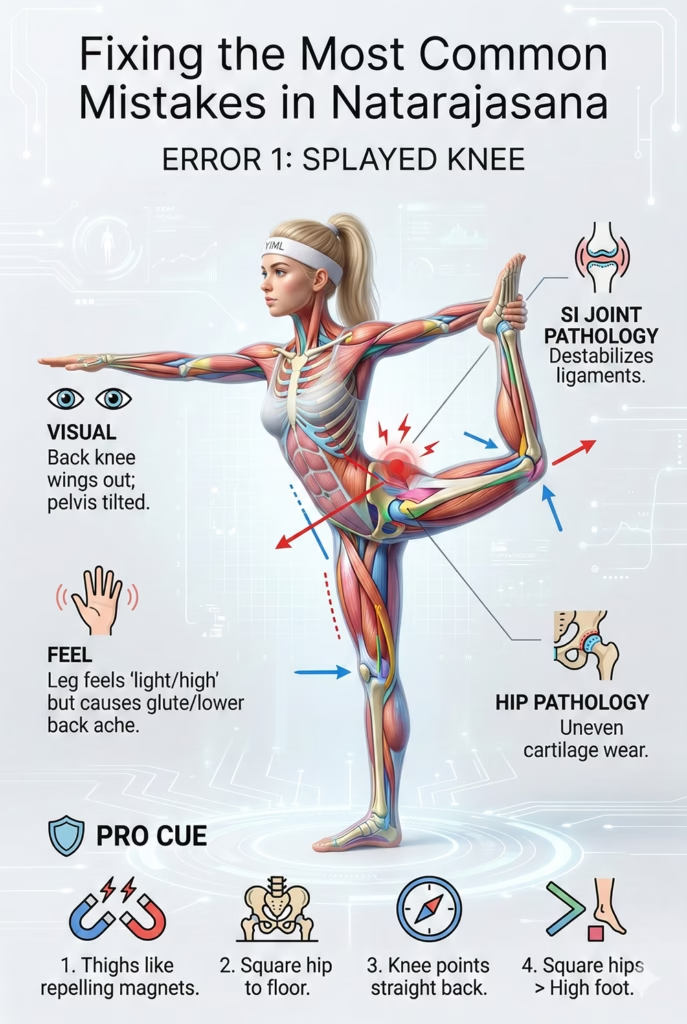
Error 1: The Splayed Knee (SI Joint Strain)
- Visual: From the front, the back knee visibly wings out to the side. The pelvis is completely tilted.
- Sensation: It feels incredibly light and easy to get the leg high, but causes a dull, lingering ache in the glutes and lower back.
- Pathology: Destabilizes the SI joint and causes uneven wear on hip cartilage over time.
- Pro Cue: “Imagine your inner thighs are repelling magnets that must stay parallel. Square your floating hip toward the floor. The back knee must point straight back. It is infinitely better to have a lower foot with square hips than a high foot with a twisted pelvis.”
Error 2: The Teeter-Totter (Losing the Backbend)
- Visual: The torso dumps forward, dropping the chest parallel to the floor as a counterweight to the back leg. It looks more like Warrior III than Dancer.
- Sensation: Intense, pulling strain in the standing hamstring; zero heart-opening sensation.
- Pathology: Eliminates the thoracic extension benefits and overloads the standing hamstring tendon.
- Pro Cue: “Lift your chest! Imagine a string pulling your sternum straight up to the ceiling. Don’t lean forward; arch upward. The harder you kick your leg back, the higher your heart must lift to create a fully tensioned bow.”

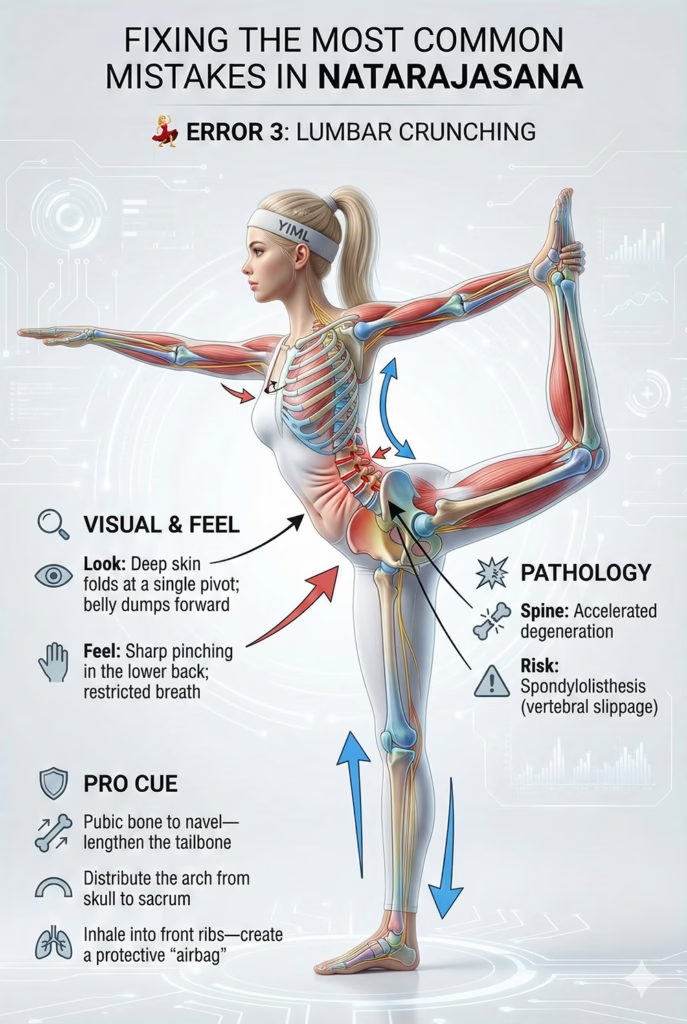
Error 3: Lumbar Crunching (Spinal Compression)
- Visual: Deep skin folds hinge at a single pivot point in the lower back. The belly dumps forward.
- Sensation: Sharp pinching in the lumbar spine, feeling compressed, and an inability to breathe deeply.
- Pathology: Spinal degeneration and potential spondylolisthesis (vertebral slippage).
- Pro Cue: “Gently draw your pubic bone toward your navel to lengthen your tailbone (a slight posterior pelvic tilt). Distribute the backbend evenly across your entire spine, from the base of your skull down to your sacrum. Inhale deeply into your front ribs to create an ‘airbag’ that protects your spine.”
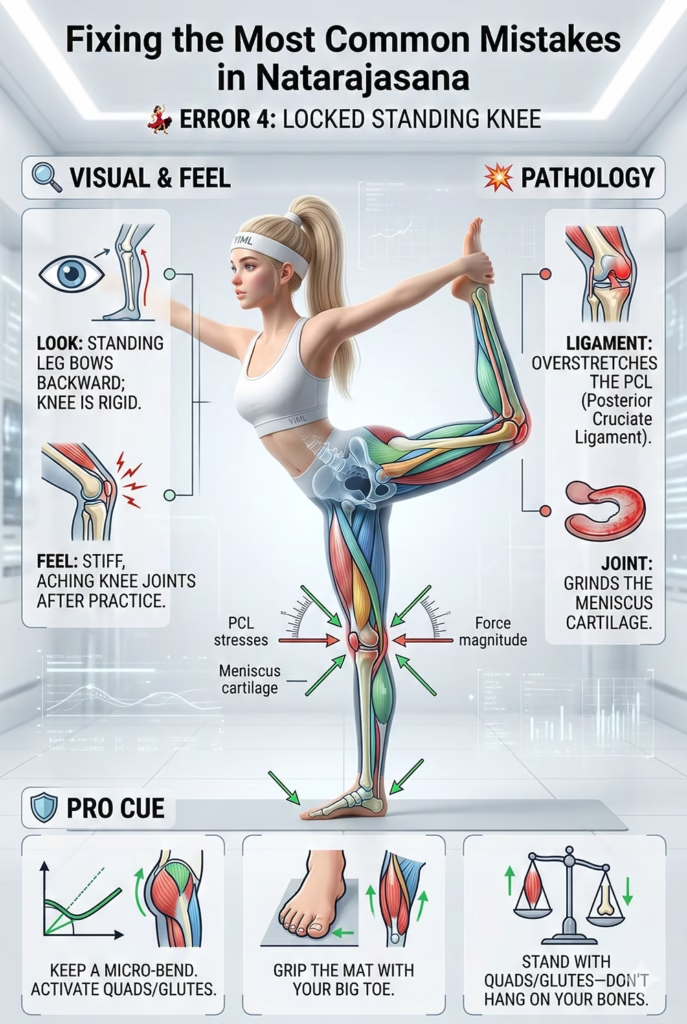
Error 4: The Locked Standing Knee (Joint Hyperextension)
- Visual: The standing leg is perfectly straight, with the knee bowing backward.
- Sensation: Rigidity during the pose; aching, stiff knee joints after class.
- Pathology: Overstretches the posterior cruciate ligament (PCL) and grinds the meniscus.
- Pro Cue: “Keep a micro-bend in your standing knee. Grip the mat fiercely with your big toe. Use your quadriceps and glutes to stand—do not hang your body weight entirely on your skeletal joints.”
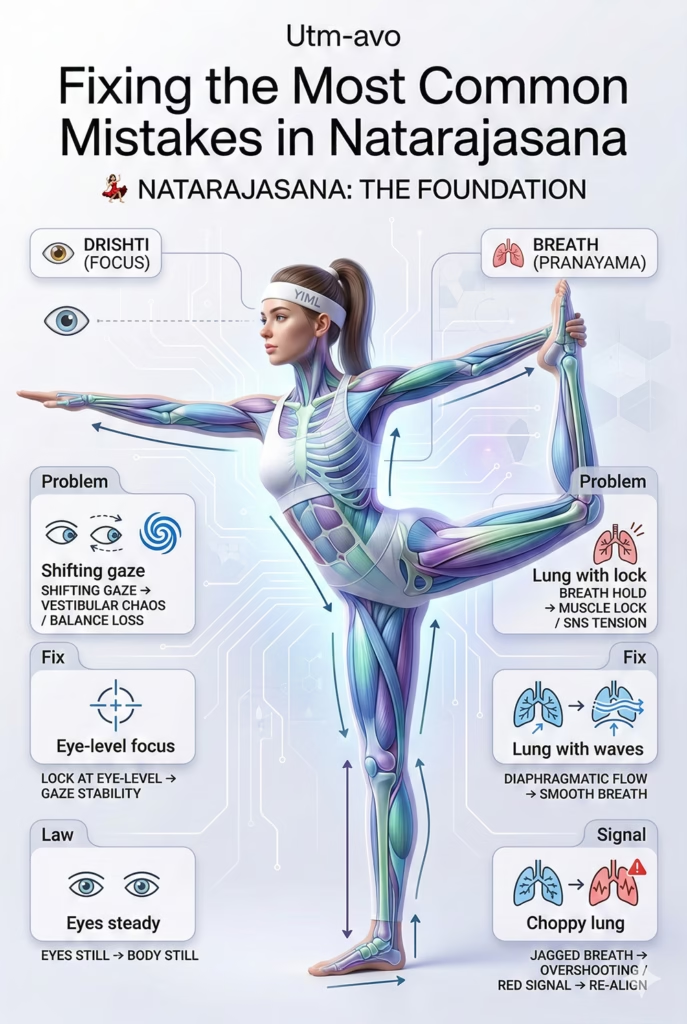
3. The Missing Foundation: Breath and Drishti
Balance and extension in Natarajasana do not come purely from muscular effort. The true foundation of this pose is neurological and respiratory.
- Drishti (Focal Point): When you constantly shift your eyes, you send mixed signals to your vestibular system, making balance impossible. The Fix: Lock your gaze onto a single, stationary point at eye level before you even lift your back foot. Let your peripheral vision soften. Where the eyes go, the body follows.
- Breath (Pranayama): When practitioners struggle for height, they inevitably hold their breath. This triggers the sympathetic nervous system (fight or flight), causing muscles to tense up and restrict the very flexibility they are trying to achieve. The Fix: Keep your breath smooth, deep, and diaphragmatic. If your breath becomes jagged or stops completely, it is your body’s undeniable signal that you have gone too deep. Back out slightly until your breath flows freely again.
4. Stop Forcing It: Smart Modifications for Tight Joints
Dancer is an advanced pose. Put your ego aside and use props to bridge the gap between where your body is today and where it is going safely.
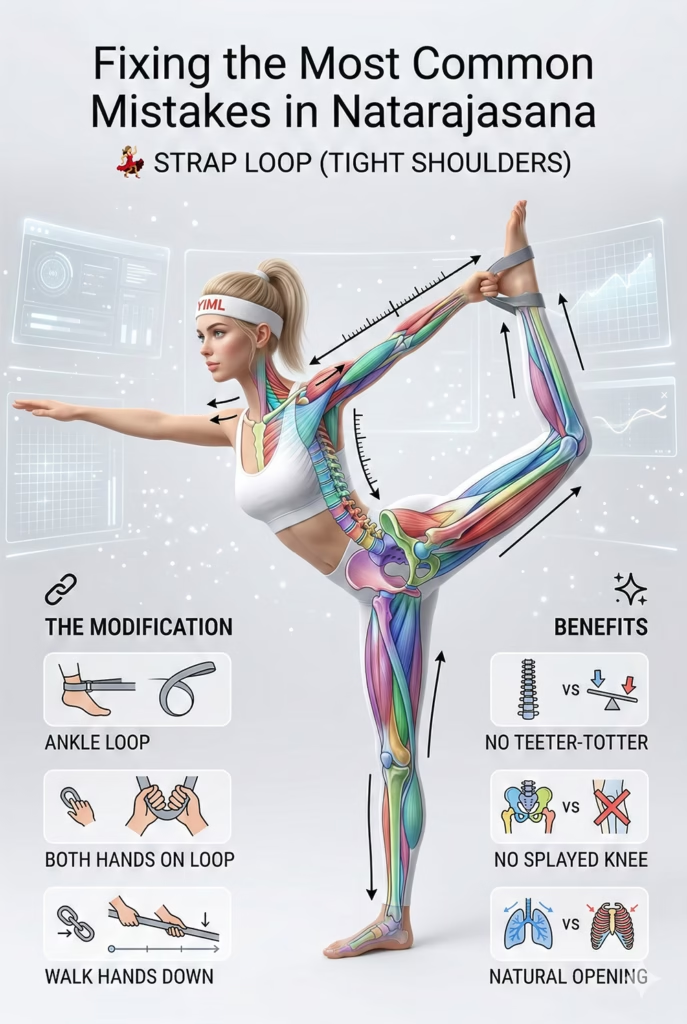
For Tight Shoulders (The Strap Loop):
Loop a yoga strap around your back ankle. Hold the strap with the same-side hand. Benefit: The strap safely “lengthens” your arm, allowing you to keep a straight spine, square hips, and an open chest without forcing the reach. Walk your hands down the strap gradually over time.
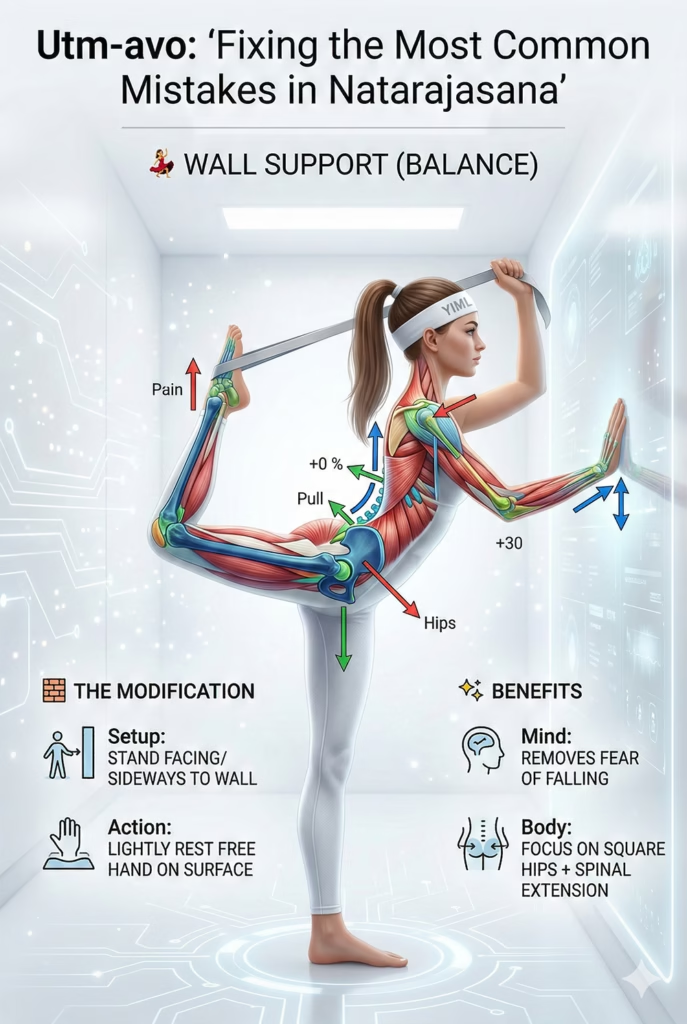
For Balance Issues (Wall Support):
Stand facing or sideways to a wall, lightly resting your free hand against it. Benefit: Removes the paralyzing fear of falling. This allows you to dedicate 100% of your mental energy to squaring your hips and refining your spinal extension.
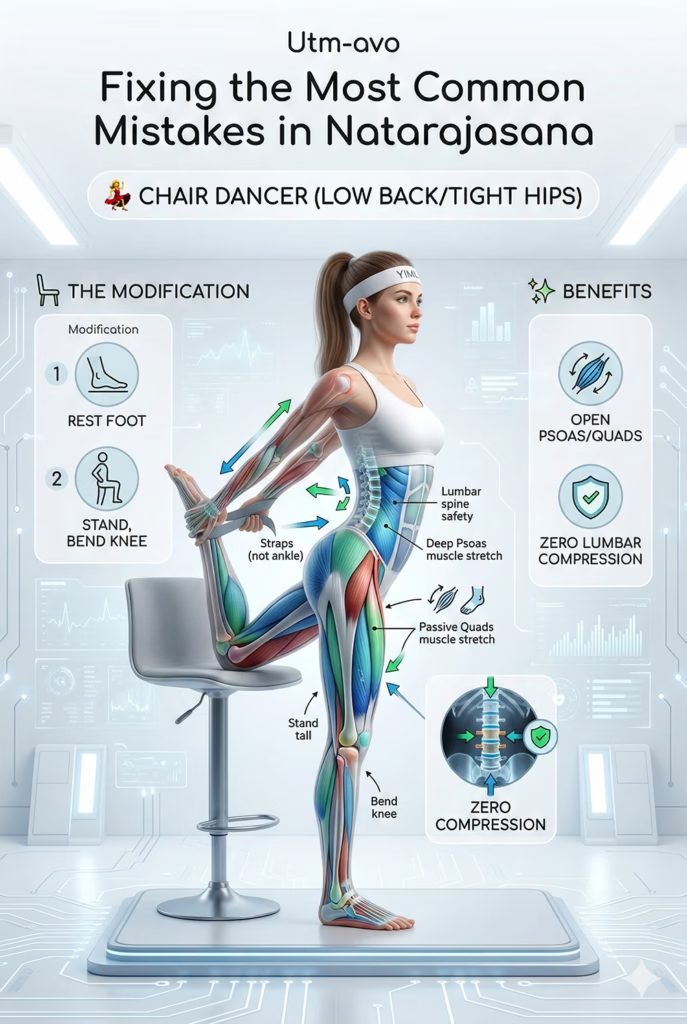
For Lower Back Pain / Tight Hips (Chair Dancer):
Rest the top of your back foot on the seat or backrest of a chair behind you. Stand tall and slowly bend your standing knee. Benefit: Passively and deeply stretches the quads and psoas in a highly controlled manner, with zero compressive force on the lumbar spine.
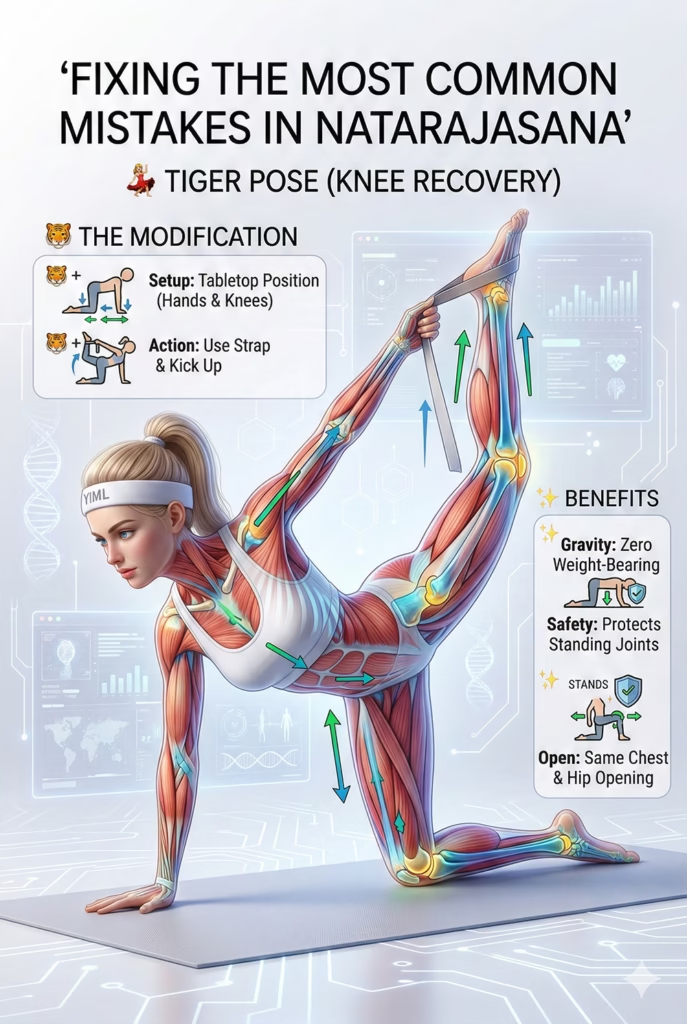
For Standing Knee Pain (Tiger Pose Variation):
Come to a tabletop position on your hands and knees. Reach back with one hand, grab the opposite ankle, and kick up. Benefit: By lowering your center of gravity and increasing contact points, you remove all weight-bearing strain from the standing joints while getting the exact same chest and hip-opening benefits.
I highly recommend analyzing your alignment in a mirror or recording yourself to identify which of these modifications will serve you best!)
5. The 15-Minute Dancer Prep Sequence (Psoas & Thoracic Focus)
You cannot force a cold body into Natarajasana. Before you attempt to balance on one leg, spend exactly 15 minutes priming the specific “Red Zone” muscles we just discussed. This targeted sequence opens the front line of your body while waking up the posterior chain.
1. Cat-Cow Progressions (Spinal Mobility) – 2 Minutes
- The Drill: Start in a tabletop position. Inhale to drop your belly and lift your chest (Cow); exhale to round your spine toward the ceiling (Cat).
- The Focus: Don’t just dump into your lower back. Focus on melting your upper back (thoracic spine) between your shoulder blades during Cow pose.
2. Low Lunge / Anjaneyasana (Psoas Release) – 4 Minutes (2 mins/side)
- The Drill: Step one foot forward between your hands and drop the back knee to the mat. Lift your torso and gently press your hips forward and down.
- The Focus: Keep your core actively engaged (tuck your tailbone slightly). This prevents lower back crunching and isolates the stretch entirely in the psoas and quadriceps of the back leg.
3. Puppy Pose / Uttana Shishosana (Shoulder & Chest Opener) – 3 Minutes
- The Drill: From tabletop, walk your hands far forward and melt your chest and forehead toward the mat while keeping your hips stacked directly over your knees.
- The Focus: This mimics the exact overhead arm position needed for King Dancer. Breathe into your armpits and let your latissimus dorsi (lats) slowly release without compressing your neck.
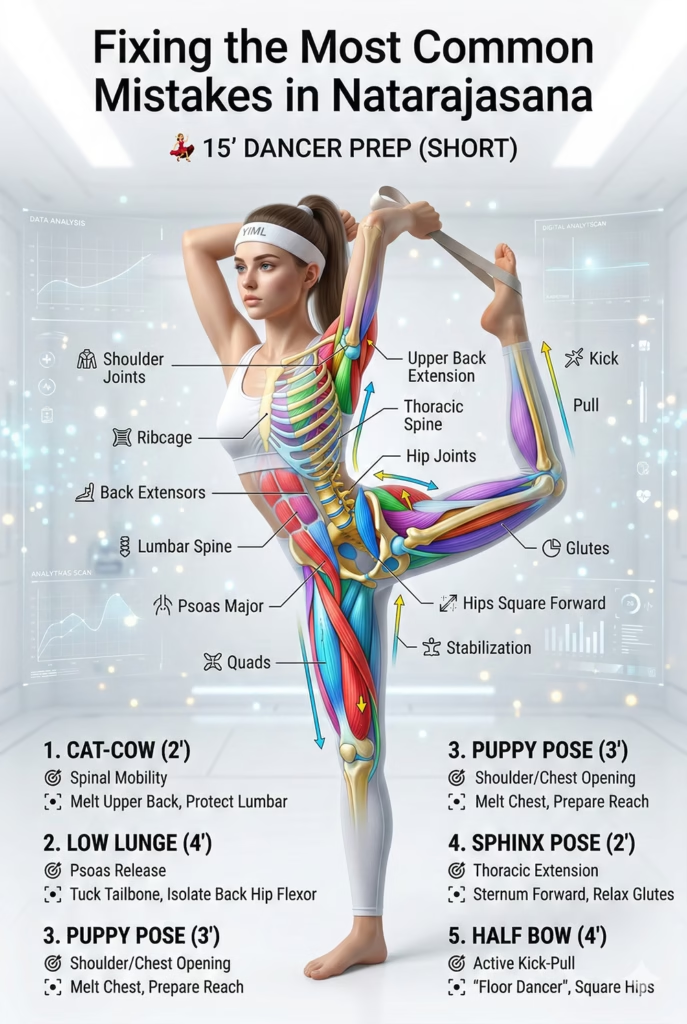
4. Sphinx Pose (Gentle Thoracic Extension) – 2 Minutes
- The Drill: Lie on your stomach, prop yourself up on your forearms, and energetically drag your elbows back toward your hips to pull your chest forward.
- The Focus: This is a safe, foundational backbend. Keep your glutes relaxed and focus on pulling your sternum forward to open the heart center, protecting the lumbar spine.
5. Half Bow / Ardha Dhanurasana (Active Posterior Chain) – 4 Minutes (2 mins/side)
- The Drill: Still on your belly, bend your right knee. Reach your right hand back to grab the outside of your right ankle. Inhale, kick your foot into your hand, and lift your chest and thigh off the floor.
- The Focus: This is Dancer Pose lying down! It trains the exact kick-and-pull mechanism required for Natarajasana but uses the floor to keep your hips perfectly square and stable.
Conclusion: The Takeaway: Ego vs. Anatomy
Dancer Pose teaches us a profound lesson: true beauty comes from structural integrity and equilibrium, not from extremes.
A healing Natarajasana is one where you stand as rooted as a tree, your hips remain humbly squared, yet your heart shines proudly forward. Do not let your ego trick you into dragging your leg higher than your anatomy currently permits. Use the strap, the wall, or the chair to find joy and sustainability in your body’s unique expression of the pose.
Remember: Conquering a yoga pose isn’t about forcing your body to fit the picture; it’s about modifying the picture to fit and heal your body.
“While mastering the lift of the back leg is often the focus, the integrity of the standing leg is what determines long-term joint health. Failing to maintain a micro-bend can lead to hyperextension, a risk factor that becomes even more critical as we age. For a deeper look at how joint stability evolves, explore our analysis on The Biomechanical Demands of Standing Yoga Poses in Seniors [RESEARCH DECODED] to understand how to protect your foundation at any stage of life.”
References
The following resources served as the foundational basis for this article. Readers are encouraged to explore these texts to deepen their understanding of asana practice and yoga philosophy.
Classical & Foundational Yoga
- Iyengar, B. K. S. (1979). Light on Yoga: Yoga Dipika. Schocken Books.
- Frawley, D., & Summerfield Kozak, S. (2001). Yoga for Your Type: An Ayurvedic Approach to Your Asana Practice. New Age Books.
- Singleton, M. (2010). Yoga Body: The Origins of Modern Posture Practice. Oxford University Press.
Yoga Anatomy & Physiology
- Kaminoff, L., & Matthews, A. (2012). Yoga Anatomy (2nd ed.). Human Kinetics.
- Long, R. (2009). The Key Muscles of Yoga: Scientific Keys, Volume I. Bandha Yoga Publications.